Table of Contents
ToggleSurgical Instruments Demystified: Essential Types, Care & Common Pitfalls to Avoid
In the intricate ballet of the operating room, where precision and patient safety are paramount, surgical instruments are far more than mere tools; they are extensions of the surgeon’s hands, enabling intricate maneuvers and life-saving interventions. From the delicate scalpel making the first incision to the robust retractors holding tissue planes, each instrument plays a critical, often irreplaceable, role. However, the sheer variety, specific uses, and stringent care requirements of these instruments can be overwhelming for anyone, from aspiring medical students to seasoned surgical technologists.
This comprehensive guide aims to demystify surgical instruments, making their understanding accessible and practical. We will explore their essential types, delve into the crucial practices of proper surgical instrument care that extend their lifespan and ensure their sterile functionality, and highlight the common pitfalls to avoid that can compromise patient safety and instrument integrity. By fostering a deeper understanding of operating room instruments, we empower healthcare professionals to contribute to a safer, more efficient, and ultimately more successful surgical environment.
The Foundation: Understanding Essential Surgical Instrument Types
Surgical instruments are meticulously designed for specific functions, classified into broad categories based on their primary use. Recognizing these surgical instrument types is the first step towards competence in the operating room.
1. Cutting & Dissecting Instruments
These instruments are designed to divide or separate tissues, often with sharp edges. Precision is paramount to avoid collateral damage.
- Scalpels:
- Description: Consists of a handle and a disposable blade. Blades come in various shapes and sizes.
- Use: Making initial skin incisions, precise cutting of tissue, and sharp dissection.
- Key Feature: Single-use, sterile blades ensure sharpness and prevent cross-contamination.
- Scissors:
- Description: Comes in various lengths, tip designs (sharp/blunt), and blade curvatures (straight/curved).
- Operating/Straight Scissors: General utility, often used for cutting sutures, gauze, or drains.
- Mayo Scissors: Heavier, robust scissors, available straight or curved. Used for cutting tough tissue like fascia, muscle, or heavy sutures.
- Metzenbaum Scissors: Delicate scissors, typically with curved, blunt tips and a longer handle-to-blade ratio. Ideal for fine dissection of soft tissues and creating tissue planes.
- Iris Scissors: Very small, sharp-pointed scissors, originally for ophthalmic surgery, but used for extremely delicate tissue dissection in various specialties.
- Use: Dissecting, cutting, trimming, and dividing tissues or materials.
- Electrosurgical/Energy Instruments (e.g., Bovie Pencil, Harmonic Scalpel):
- Description: Instruments that use high-frequency electrical current or ultrasonic energy to simultaneously cut and coagulate tissue.
- Monopolar Instruments: Current flows from the active electrode (instrument tip) through the patient to a grounding pad. Examples: Bovie pencil (spatula, hook, needle tips), monopolar scissors, dissectors. Used for general cutting and coagulation.
- Bipolar Instruments: Current flows only between the two tips of the instrument (e.g., bipolar forceps), localizing the energy effect. Used for precise coagulation of small vessels.
- Harmonic Scalpel (Ultrasonic): Uses ultrasonic vibrations to cut and coagulate, creating less smoke and thermal spread than electrocautery.
- Use: Rapid, controlled cutting and hemostasis, reducing the need for sutures or clips in many instances.
2. Grasping & Holding Instruments
These instruments are used to hold, manipulate, or stabilize tissues, needles, or other materials.
- Forceps (Non-Locking):
- Description: Hand-held instruments that operate like tweezers, relying on finger pressure to hold. Tips vary widely.
- Adson Forceps: Fine tips, often with teeth (toothed Adson) for skin or without teeth (smooth Adson) for delicate tissue.
- DeBakey Forceps: Long, slender, non-crushing serrations; ideal for grasping delicate vessels or bowel without trauma.
- Tissue Forceps (e.g., Russian, Brown-Adson): Heavier, with prominent teeth for grasping denser tissues like fascia or muscle.
- Use: Holding tissue during dissection, passing sutures, grasping needles, and retrieving foreign bodies.
- Hemostatic Forceps (Clamps – Locking):
- Description: Feature finger rings, a ratchet mechanism for locking, and serrated jaws.
- Kelly/Crile Forceps: Medium-sized, with serrations extending varying lengths down the jaw. Used for clamping blood vessels or grasping tissue.
- Halsted Mosquito Forceps: Smallest hemostats, delicate jaws with fine serrations. Used for clamping small bleeders.
- Kocher Forceps: Strong, toothed jaws for grasping tough, fibrous tissue (e.g., fascia, bone fragments).
- Pean Forceps: Heavy, transverse serrations, often used for clamping large tissue bundles or vessels.
- Use: Clamping blood vessels to achieve hemostasis, grasping tissue, and holding sponges.
- Towel Clamps:
- Description: Sharp, pointed jaws that lock.
- Backhaus Towel Clamp: Most common.
- Use: Securing surgical drapes to the patient or each other; sometimes used to grasp tough tissue or hold tubes.
- Allis/Babcock Clamps:
- Description: Locking clamps with unique jaw designs for tissue grasping.
- Allis Clamp: Toothed, often used for grasping fascia, fibrous tissue, or organs that will be removed. It can be traumatic.
- Babcock Clamp: Non-crushing, fenestrated (windowed) jaws with no teeth. Ideal for grasping delicate structures like the bowel, fallopian tubes, or appendix without causing significant trauma.
- Use: Atraumatic or semi-traumatic tissue grasping.
3. Retracting & Exposing Instruments
Used to hold back tissues or organs, providing a clear view of the surgical field.
- Hand-Held Retractors:
- Description: Held manually by a surgical assistant.
- Army-Navy: Double-ended, blunt blades, used for shallow retraction.
- Senn Retractor: Double-ended, one blunt blade, one three-pronged rake (sharp or blunt). Used for small incisions.
- Volkmann Retractor (Rake): Finger-ring handle with varying numbers of prongs (sharp or blunt).
- Use: Providing dynamic, adjustable retraction to expose the surgical site.
- Self-Retaining Retractors:
- Description: Utilize a locking mechanism (ratchets or frames) to maintain retraction without continuous manual holding.
- Weitlaner Retractor: Multiple sharp or blunt prongs on hinged arms that spread apart. Used for superficial retraction.
- Balfour Retractor: Large frame with interchangeable blades, including a central blade for abdominal wall retraction. Used for deep abdominal retraction.
- Bookwalter Retractor: A complex, versatile system with a main ring and various attachable arms and blades. Used for wide, deep retraction in major abdominal cases.
- Use: Freeing up surgical assistants’ hands, providing consistent retraction.
4. Suturing & Ligating Instruments
Used for closing wounds, approximating tissues, and tying off vessels.
- Needle Holders (Needle Drivers):
- Description: Specifically designed to securely grasp and hold surgical needles. Jaws can be smooth or serrated, often with a tungsten carbide insert for durability.
- Mayo-Hegar Needle Holder: Common, sturdy, with a broad jaw.
- Olsen-Hegar Needle Holder: Combines a needle holder with a built-in scissor for cutting sutures.
- Castroviejo Needle Holder: Very delicate, spring-loaded; used in micro-surgery or ophthalmic procedures.
- Use: Guiding the needle through tissue to place sutures.
- Automated Suturing Devices/Staplers:
- Description: Advanced instruments that deploy staples or pre-loaded sutures rapidly, often used for tissue transection, anastomosis, or rapid closure.
- Use: Efficiently closing long incisions, creating bowel anastomoses, and ligating large tissue pedicles.
5. Suctioning & Aspirating Instruments
Used to remove blood, fluids, and debris from the surgical field to maintain clear visualization.
- Suction Tips:
- Description: Slender tubes with openings, connected to a vacuum source.
- Frazier Suction Tip: Fine, malleable tip, often with a finger control hole. Ideal for delicate aspiration (e.g., neurosurgery, vascular).
- Poole Suction Tip: Multiple holes at the tip and along the shaft, designed for high-volume aspiration (e.g., irrigation fluid, large blood clots) without clogging or sucking in bowel.
- Use: Maintaining a clear surgical field by removing fluids and debris.
The Lifespan of an Instrument: Crucial Surgical Instrument Care
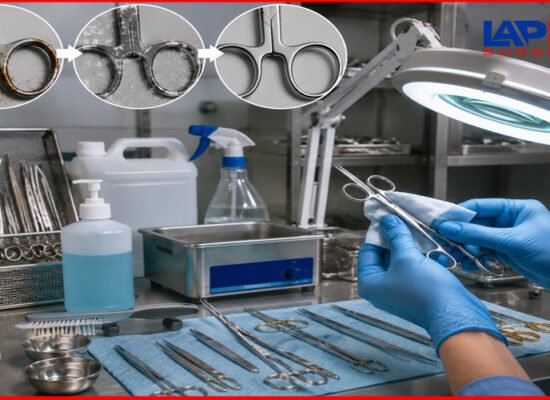
Proper surgical instrument care is not merely about cleanliness; it’s a critical component of surgical instrument safety, ensuring instruments function correctly, remain sterile, and have an extended lifespan. Neglecting care can lead to instrument damage, patient infection, and increased costs.
1. Point-of-Use Cleaning (Before Sterilization)
- Importance: This is the first and most critical step in preventing bioburden (blood, tissue, fluids) from drying onto the instrument surface. Dried bioburden is extremely difficult to remove and can hinder effective sterilization.
- Process: Immediately after use, wipe instruments clean with a moist sponge. If possible, rinse off gross contamination with sterile water. For instruments with lumens or hinges, flush with water or apply an enzymatic foam/gel.
- Why it works: Enzymes break down organic material, keeping it moist and making subsequent cleaning easier.
2. Transport to Decontamination
- Importance: Prevents the spread of contaminants from the operating room to the sterile processing department (SPD).
- Process: Instruments should be transported in closed, leak-proof containers or carts. Contaminated instruments should always be separated from clean items.
3. Decontamination & Manual Cleaning
- Importance: Thoroughly removes all visible soil, organic material, and microorganisms, preparing instruments for sterilization. Sterilization cannot occur effectively if instruments are not meticulously cleaned.
- Process:
- Personal Protective Equipment (PPE): Always wear appropriate PPE (gloves, gowns, eye protection, masks) when handling contaminated instruments.
- Soaking: Instruments are soaked in an enzymatic solution, which helps further break down dried bioburden.
- Brushing/Scrubbing: Manually scrub instruments, especially in serrations, hinges, lumens, and intricate parts, using soft brushes and detergents. Pay special attention to the “box locks” of clamps and hinges of scissors.
- Rinsing: Thoroughly rinse instruments under running purified (demineralized or distilled) water to remove all detergent residue. Residual chemicals can cause staining or pitting during sterilization.
- Ultrasonic Cleaner: Instruments are placed in an ultrasonic cleaner, which uses high-frequency sound waves to create microscopic bubbles that implode (cavitation), dislodging debris from hard-to-reach areas. This is particularly effective for hinged instruments and those with lumens. Follow the manufacturer’s guidelines for time and temperature.
4. Inspection & Maintenance
- Importance: Ensures instruments are fully functional, undamaged, and ready for use. Detects problems that could compromise patient safety or instrument performance.
- What to Inspect:
- Corrosion: Look for rust spots, pitting, or discoloration. Often caused by improper cleaning, harsh chemicals, hard water, or mixing dissimilar metals.
- Cracks/Breaks: Examine tips, jaws, shafts, and hinges for any hairline cracks or actual breaks. A damaged instrument can break during surgery, leaving fragments behind.
- Alignment: Check that the jaws of the clamps and scissors align perfectly. Misaligned jaws can compromise function.
- Sharpness: Scissors should cut cleanly to the tip (perform a cutting test on gauze). Scalpel blades are single-use. Dull instruments cause tissue trauma.
- Functionality of Hinges & Joints: Test hinges for smooth, free movement. They should not be stiff, loose, or sticky. Ratchets on clamps should lock securely and release easily.
- Insulation: For energy instruments, meticulously inspect the insulation along the entire shaft for any nicks, cracks, or punctures. A compromised insulation can lead to dangerous stray current burns.
- Lubrication: Apply an instrument lubricant (often called “instrument milk”) specifically designed for surgical instruments, especially to hinges and moving parts. This prevents friction, rust, and extends instrument life.
5. Packaging
- Importance: Maintains the sterility of the instrument until the point of use.
- Process: Instruments are arranged in trays or sets, then wrapped in sterilization wraps, placed in sterile pouches, or loaded into rigid sterilization containers.
- Indicators: Chemical indicators are placed inside and outside the package to confirm exposure to the sterilization process.
6. Sterilization
- Importance: The definitive step to destroy all microorganisms, including spores, making instruments safe for surgical use.
- Types of Sterilization:
- Autoclaving (Steam Sterilization): Most common and effective. Uses high-pressure saturated steam at specific temperatures (e.g., 121°C or 132°C) for a set time.
- Gravity Displacement: Steam enters, forcing air out.
- Pre-vacuum: Air is actively removed before steam enters, ensuring faster and more complete penetration.
- Low-Temperature Sterilization: Used for heat-sensitive or moisture-sensitive instruments.
- Ethylene Oxide (EtO): A gas sterilization method, requires aeration time.
- Hydrogen Peroxide Plasma (Sterrad/V-Pro): Faster cycle, no toxic byproducts, but has material limitations.
- High-Level Disinfection (HLD): Used for semi-critical items (e.g., endoscopes that contact mucous membranes but don’t penetrate sterile tissue). This does not kill all spores and is NOT true sterilization for surgical instruments that penetrate tissue.
- Autoclaving (Steam Sterilization): Most common and effective. Uses high-pressure saturated steam at specific temperatures (e.g., 121°C or 132°C) for a set time.
- Why: Ensures prevention of surgical site infections (SSIs).
7. Storage
- Importance: Maintains sterility and prevents damage post-sterilization.
- Process: Sterile instruments are stored in a clean, dry, temperature-controlled, and designated area, protected from dust, moisture, and physical impact.
8. Instrument Tracking & Inventory Management
- Importance: Essential for quality control, managing maintenance schedules, and tracing instruments in case of a product recall or infection outbreak.
- Process: Many facilities use barcode systems to track individual instruments or sets through the entire reprocessing cycle and to specific patients.
Common Pitfalls to Avoid: Ensuring Surgical Instrument Safety
Even with knowledge of surgical instrument types and proper care, several common pitfalls can undermine patient safety and compromise the functionality of these vital tools. Being aware of and proactively avoiding these issues is crucial.
1. Improper Identification & Handing
- Pitfall: Using the wrong instrument for the task (e.g., heavy Mayo scissors on delicate tissue, using tissue forceps on a vessel that needs atraumatic DeBakey). Incorrectly passing instruments to the surgeon (e.g., not in a safe zone, not in a ready position).
- Consequences: Inefficiency, tissue trauma, instrument damage, and sharps injuries to staff.
- Avoidance: Thorough training in instrument identification and proper sterile technique for passing. Utilize a “neutral zone” for sharps to minimize hand-to-hand contact.
2. Ignoring Instrument Damage or Dullness
- Pitfall: Continuing to use scissors that tear tissue instead of cutting, instruments with bent tips, cracked ratchets, or loose hinges.
- Consequences: Increased tissue trauma, longer operative time, compromised surgical instrument safety (e.g., instrument breakage inside the patient leading to retained foreign bodies or fragments).
- Avoidance: Rigorous inspection after every use and before every sterilization cycle. Establish a clear system for removing damaged or dull instruments for repair or replacement.
3. Inadequate Cleaning & Sterilization
- Pitfall: Dried blood or tissue remaining on instruments, improper loading of sterilization trays (overloading, wrong orientation), and using non-validated sterilization cycles.
- Consequences: Most critically, Surgical Site Infections (SSIs), as microorganisms can survive if bioburden prevents sterilant penetration. Also, instrument corrosion and staining.
- Avoidance: Adhere strictly to the manufacturer’s IFUs (Instructions For Use) for cleaning and sterilization. Ensure staff are properly trained and adhere to sterile processing best practices. Perform point-of-use cleaning.
4. Improper Use of Energy Instruments
- Pitfall: Using monopolar instruments with damaged insulation, failing to apply or check the grounding pad, excessive power settings, or activating energy too close to vital structures.
- Consequences: Inadvertent thermal burns to patient or staff, often unseen (e.g., stray current from insulation breach), severe patient injury, and potential litigation.
- Avoidance: Meticulous insulation inspection before and during surgery. Strict adherence to safe energy use protocols. Regular training on surgical instrument safety for energy devices.
5. Mixing Dissimilar Metals
- Pitfall: Placing instruments made of different metals (e.g., stainless steel with plated instruments, or carbon steel) in the same cleaning or sterilization bath.
- Consequences: Galvanic corrosion, where one metal corrodes rapidly and transfers rust to the other, leading to pitting and irreversible damage.
- Avoidance: Segregate instruments by metal type for cleaning and sterilization. Use purified water.
6. Overloading Sterilization Trays
- Pitfall: Packing too many instruments into a single sterilization tray, preventing proper steam or sterilant penetration.
- Consequences: Incomplete sterilization increases the risk of SSIs.
- Avoidance: Follow recommended loading guidelines for each sterilization tray and method. Ensure instruments are open and disassembled (if applicable) to allow full contact with the sterilant.
7. Improper Storage
- Pitfall: Storing sterile instruments in areas prone to dust, moisture, extreme temperatures, or physical impact.
- Consequences: Contamination, re-sterilization cycles, or physical damage (e.g., bending tips).
- Avoidance: Store instruments in designated, clean, dry, and protected areas according to facility protocols.
8. Neglecting Preventive Maintenance
- Pitfall: Failing to regularly lubricate instruments, not sending them for professional sharpening when dull, or delaying repairs for minor issues.
- Consequences: Instrument seizure, excessive wear and tear, premature instrument failure, increased costs due to early replacement.
- Avoidance: Implement a robust preventative maintenance schedule. Train staff to identify instruments needing repair or sharpening.
Surgical instruments are the very bedrock of safe and effective surgical practice. Far from mere inanimate objects, they are sophisticated tools that, when understood and cared for meticulously, become seamless extensions of the surgical team’s expertise. This guide to surgical instruments demystified has highlighted their essential types, detailed the crucial steps in their care, and illuminated the common pitfalls to avoid.
From the initial point-of-use cleaning to their meticulous sterilization and proper storage, every step in an instrument’s journey impacts its functionality and, by extension, patient safety. By embracing this knowledge and adhering to rigorous protocols, healthcare professionals ensure not only the longevity and performance of these vital operating room instruments but also contribute directly to reducing complications and achieving superior outcomes in every procedure. Continuous education and unwavering attention to detail will forever remain the keys to upholding the highest standards of surgical instrument safety.
👉 For more information, feel free to contact the Lapex Surgical support team.
Q1: What's the difference between surgical-grade stainless steel and regular stainless steel?
A1: Surgical-grade stainless steel, typically 300 or 400 series (e.g., 316L or 420), contains higher concentrations of chromium, nickel, and sometimes molybdenum. This composition provides superior resistance to corrosion, rust, and staining, especially when exposed to blood, tissue, and harsh cleaning agents, which is essential for repetitive sterilization processes and patient safety. Regular stainless steel lacks this enhanced corrosion resistance.
Q2: How often should surgical instruments be sharpened?
A2: The frequency of sharpening depends heavily on the instrument type, its frequency of use, and the nature of the tissues it cuts. There’s no fixed schedule. Instead, instruments (especially scissors) should be regularly inspected for sharpness using a cutting test (e.g., cutting through a single layer of gauze or a glove). If they tear or snag rather than cut cleanly, they need professional sharpening. Dull instruments lead to tissue trauma and prolonged surgery.
Q3: Can instruments be reused if they are marked "disposable"?
A3: Not. Disposable instruments are designed for single use only. Reusing them compromises patient safety due to potential material degradation, functional failure, and the inability to reliably re-sterilize them. It also carries significant legal and ethical implications.
Q4: What causes "rust" on instruments, and how can it be prevented?
A4: What often appears as “rust” on stainless steel instruments is usually staining or corrosion rather than true rust. Common causes include: * Improper Cleaning: Dried blood or tissue left on instruments. * Hard Water: High mineral content used for rinsing/sterilization. * Harsh Chemicals: Using non-surgical grade detergents or household bleach. * Dissimilar Metals: Placing different types of metals (e.g., carbon steel, plated instruments) together during cleaning, leading to galvanic corrosion. * Prevention: Use purified water for rinsing and sterilization; use pH-neutral, surgical-grade detergents; perform immediate point-of-use cleaning; avoid mixing dissimilar metals; ensure thorough drying
Q5: Why is proper instrument identification so important in the OR?
A5: Proper instrument identification is crucial for several reasons: * Efficiency: Allows the surgical team to quickly locate and hand the correct instrument, reducing operative time. * Safety: Ensures the right tool is used for the right task, preventing tissue trauma or damage from inappropriate instrument use. * Sterile Field Integrity: Reduces the need for team members to search for instruments, maintaining focus on the sterile field. * Inventory Management: Aids in tracking and managing instrument sets, reducing loss or misplacement.
Q6: What is a "neutral zone" in instrument passing, and why is it used?
A6: A “neutral zone” is a designated area on the sterile field (e.g., a specific basin or mat) where sharp instruments (like scalpels, needles, or heavy clamps) are placed by the person who used them and picked up by the next person. This eliminates the need for direct hand-to-hand passing of sharps, significantly reducing the risk of sharps injuries (needle sticks, cuts) to surgical team members.